
EE 15Q, The Art and Science of Engineering Design • Winter 2022
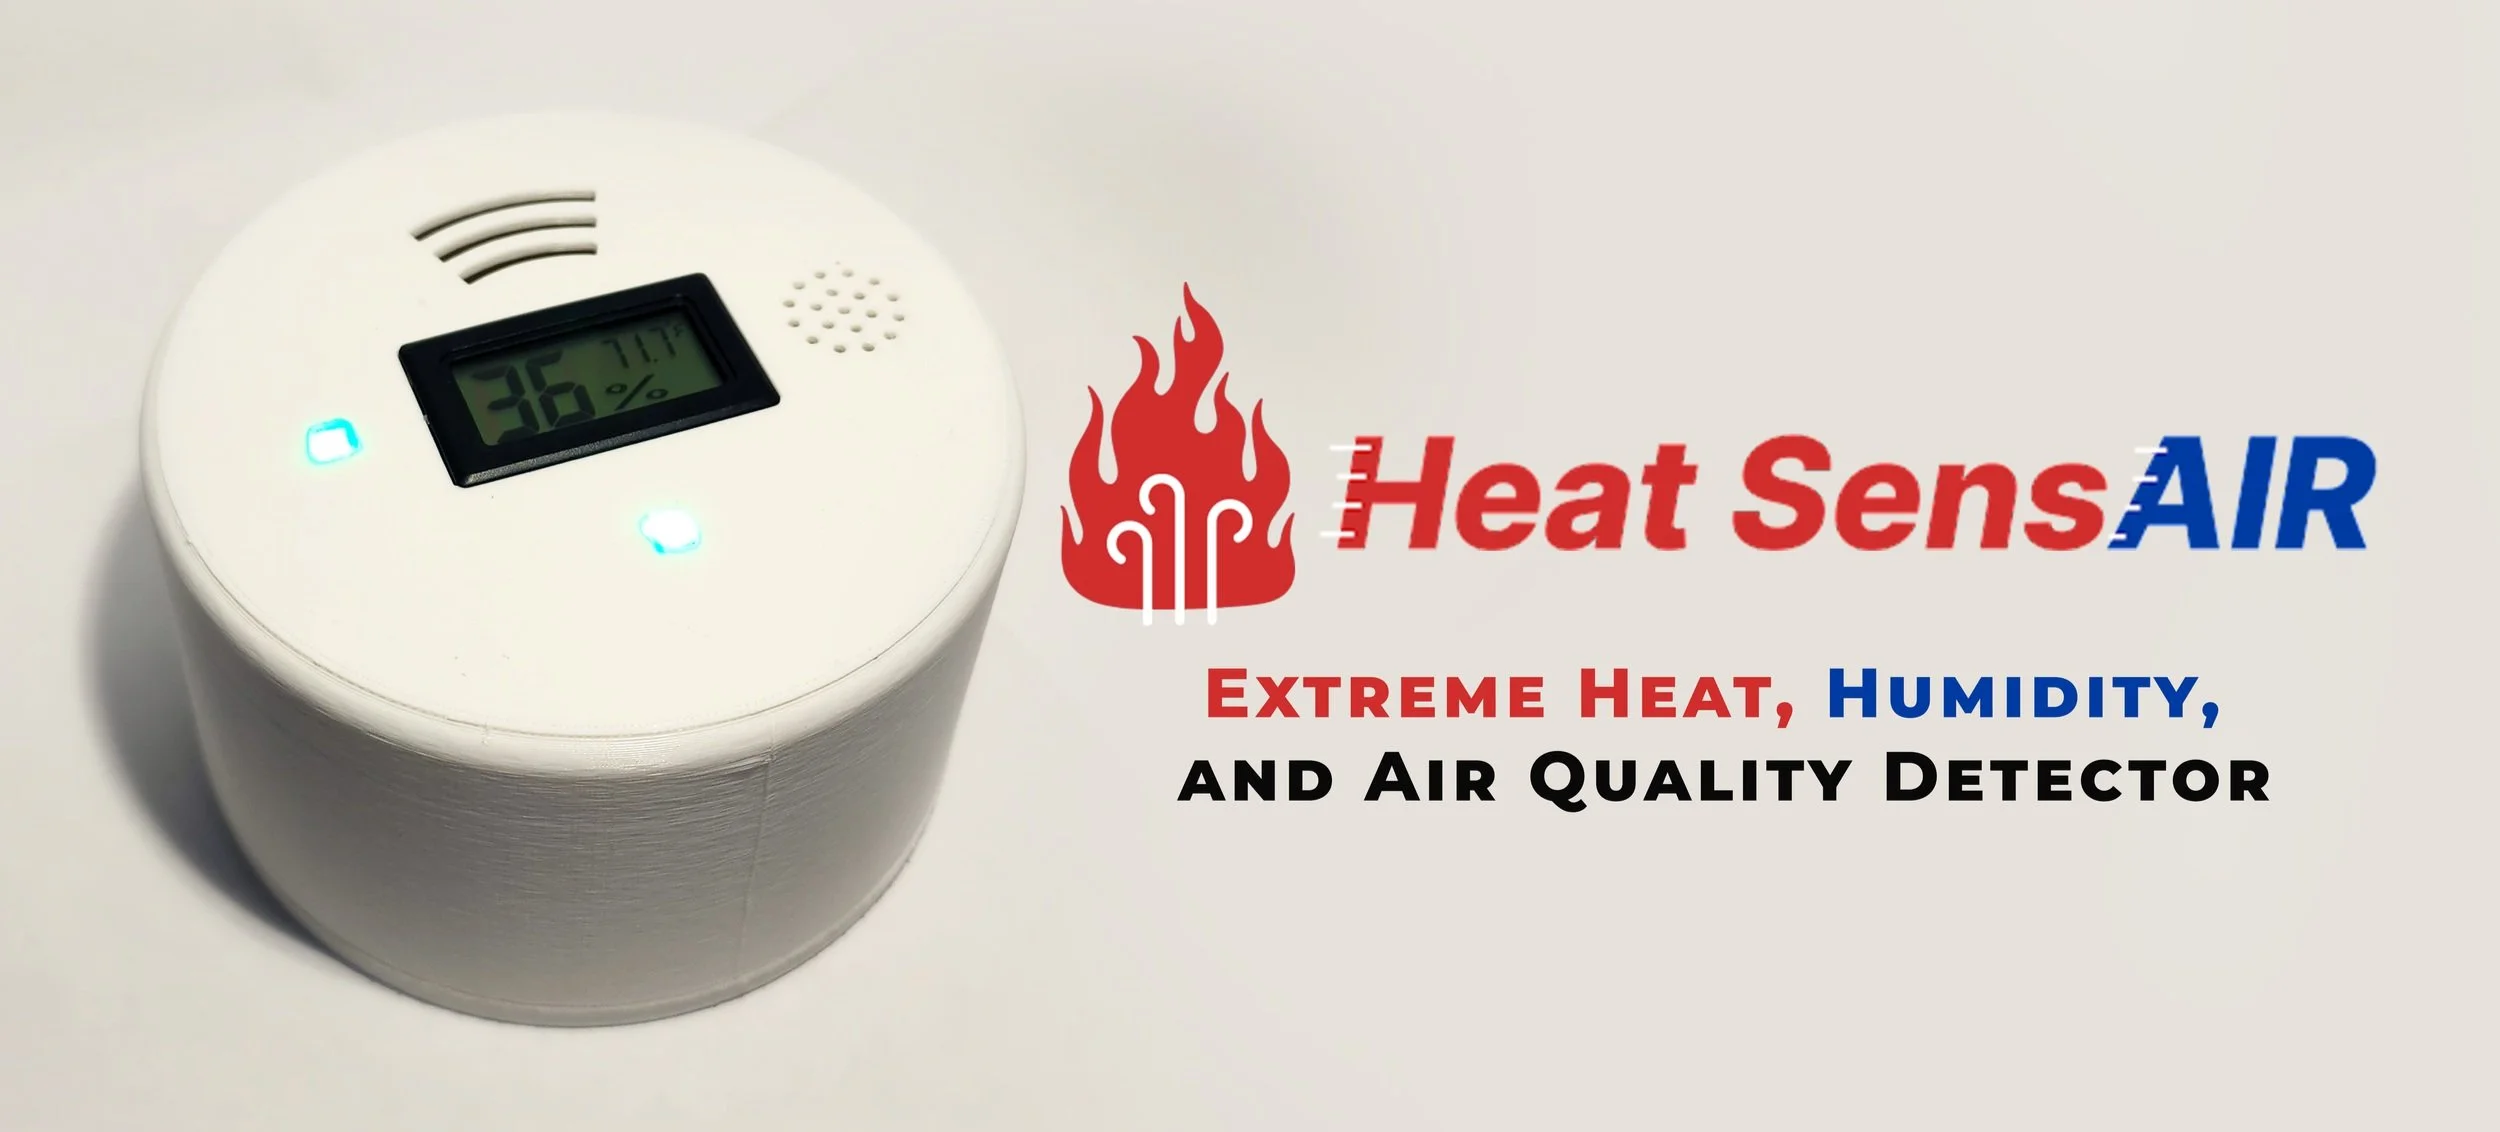
Heat SensAIR
An extreme heat, humidity, and air quality detector
In collaboration with Bala Vinaithirthan, Charles Shi, and Sal Amezcua
Abstract
Climate change is worsening heat waves and air pollution, climate disasters that are already responsible for the most deaths in California. In the next several years, the Bay Area, a region that has been historically temperate and lacks air conditioning, will need measures to warn its most vulnerable populations in times of extreme heat and poor air quality. In particular, low-income and senior populations are among the most vulnerable, and it is crucial to design solutions with these communities in mind. Heat SensAIR is our proposed solution: a combined extreme heat and air quality sensor that alerts its users when temperature, humidity, and particulate matter pollution reach dangerous levels. Our prototype reads these values and implements an LED and speaker system to alert users when thresholds are met.
Executive Summary
We, as the HeatSensAIR group, through background research of extreme heat and wildfires in the Bay and how they affect the elderly, and interviews with various organizations, seniors and individuals in government, discovered the problem of low-income seniors in the Bay Area not being properly prepared to act and notified in the event of extreme heat or wildfire conditions. In the analysis of existing products/approaches to heat control, heat prevention and air quality detection, we found that these products only partially address this problem. After brainstorming a direction for our solution, we decided to design an accessible temperature and air quality sensing device designed specifically for the elderly that will alert them of the danger of real-time air quality and temperature conditions. Based on this direction, we set the primary objectives and constraints for this design project, revolving around the alert system of our device, an accessible design for seniors, and its deployability to seniors and then sketched potential interpretations of the objectives for the device. While making decisions about the device’s final internal, external and alarm system designs based on our potential design sketches, we utilized methods of comparison through priority check mark and best of class charts to evaluate the design alternatives and cement our final design choices. The final design has aspects of each of the most relevant potential design aspects to meet our accessible design objectives of perceptibility, ease of use, low effort, simplicity and non-obstructiveness for seniors. Here, we demonstrate our final design details through a walkthrough of our prototyping process, a thorough description of our device’s electronic components design, external casing design and programming design and an explanation of our testing process for our device. Furthermore, we include a bill of materials (cost estimate) of our device and points of future work to improve our prototype and final device even further to meet our objectives. In conclusion, this report highlights the potential feasibility, effectiveness and positive impacts of our device in the fight against climate change.

Benchmarking
While plenty of products on the market claim to cool the user or provide a reading on current temperature and humidity conditions, no product currently alerts the user when conditions become unsafe. How hot is too hot?
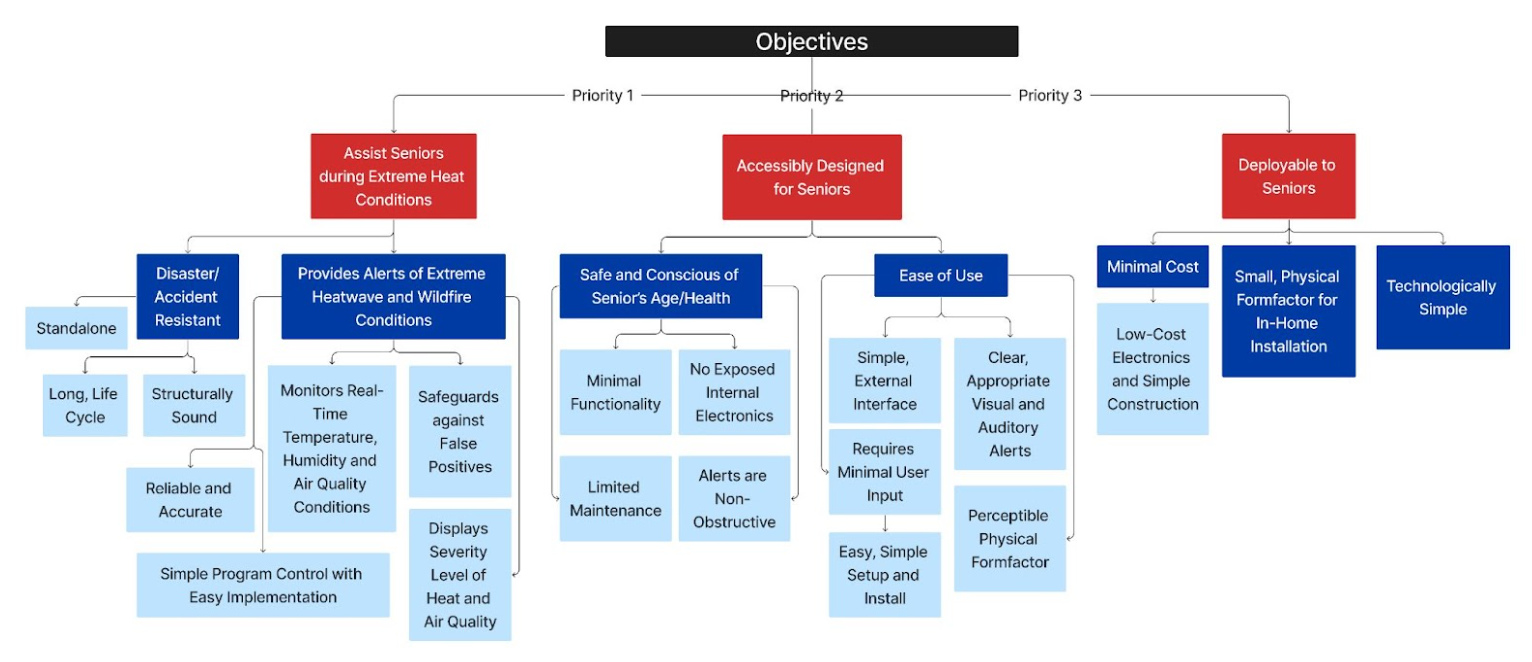
Objective tree outlining design goals and priorities. For the product to be viable, it needs to perform the desired function (assisting seniors during extreme heat conditions), be accessibly designed, and deployable. All design choices were made to work towards one of these three goals.
Design Sketches
-
Design 1: Perceptible & Recognizable
Large size in relation to size range, polyhedron or sphere shape
Bamboo/wood
Mounted to wall with adhesive strip
LED Lights
LCD Screen
Custom sound through speaker
Main alert when air quality or temperature are high danger, minor alert when air quality or temperature are medium danger level, and no alert when both are low danger level

-
Design 2: Easy, Simple, & Low Effort
Medium size in relation to size range, cube/rectangular prism shape
Plastic (PLA)
Sits over a table
LED lights
Loud buzz/beep through buzzer
Auditory and visual alerts for when either air quality or temperature are high danger level, otherwise shows visual cue of danger level thru LEDs

-
Design 3: Unobtrusive & Discreet
Small size in relation to range, cylinder shape
Plastic (PLA)
Sits on floor
Custom loud sound through speaker
Alerts through phone notifications and app
Alerts for when either air quality or temperature are high danger level, otherwise sends danger level information to app on phone

Design Selection
We ranked each design based on general knowledge of each of the components. Custom-boards tend to be more expensive, their implementation is more difficult, but their functionality is a lot more personalized. Development boards bought from Adafruit, like the Feather, come fully assembled and tested with useful libraries and other benefits that lets a user quickly use it with the Arduino IDE to make it easier and accessible to program. Boards from Arduino, Launchpad and Raspberry Pi are relatively interchangeable and standard minus the added Adafruit bonuses.
Overall, we decided to build on an internal electronics design similar to that of our 2nd potential design consisting of an Adafruit Feather board, laser diffraction/scattering sensor, and temperature, humidity, pressure, and gas combo sensor.
Electronic Components
-
![]()
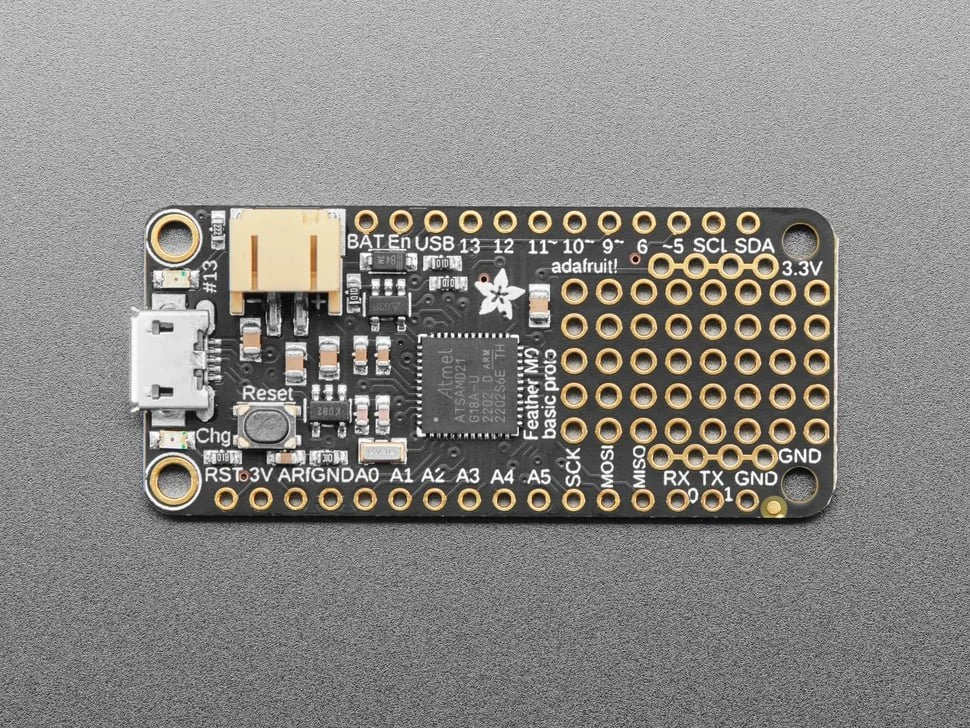
Feather M0 Basic Proto: Microcontroller
The Feather M0 Basic Proto, developed by Adafruit, is a microcontroller that utilizes the Arduino platform. It contains a 48MHz processor with 3.3V logic. Importantly, it supports SPI and I2C protocols (necessary for our sensors) and analog output, has USB serial support for programming and debugging, and runs from a 3.7V lithium-ion battery, which is crucial for our portable application.
-
![]()
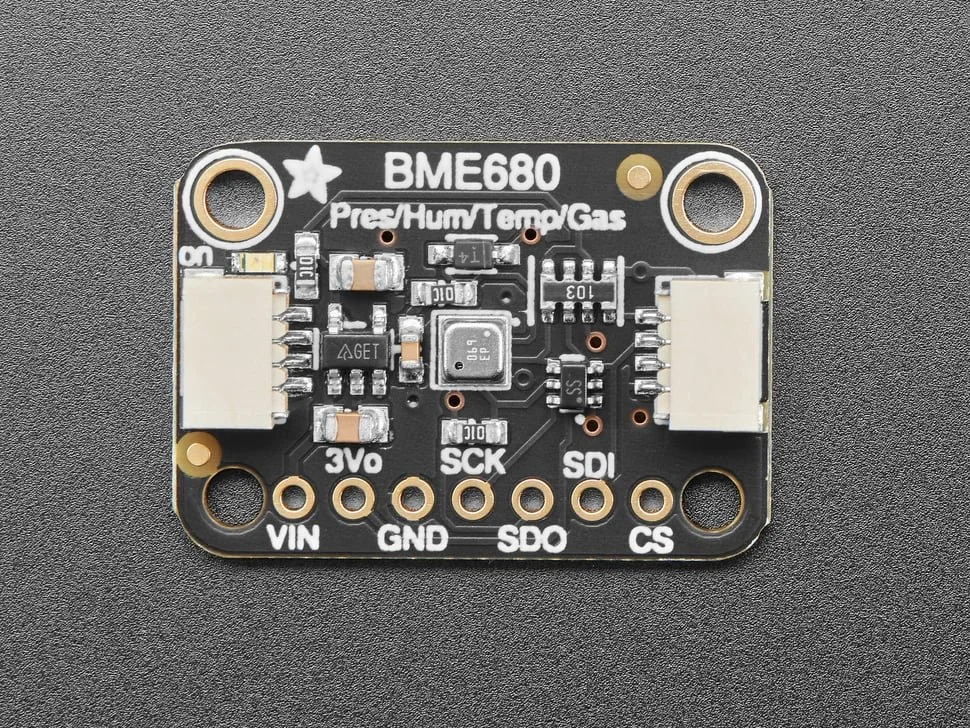
BME 680: Temperature & Humidity Sensor
The BME680 is a miniature sensor that can measure temperature, humidity, barometric pressure, and VOC gas concentrations. This sensor has a margin of error of ±3% relative humidity and ±1.0 °C temperature, making it ideal for our applications. It is compatible with the 3.3V output of the Feather M0 and can run through SPI or I2C, allowing for increased flexibility. While the VOC metal oxide gas sensor technically does enable measurements of air quality, metal oxide sensors are uniquely sensitive to changes in temperature, humidity, pressure and a range of gasses. They require extensive calibration and burn-in time to function optimally. Therefore, we decided to also purchase a separate PM sensor.
-
![]()
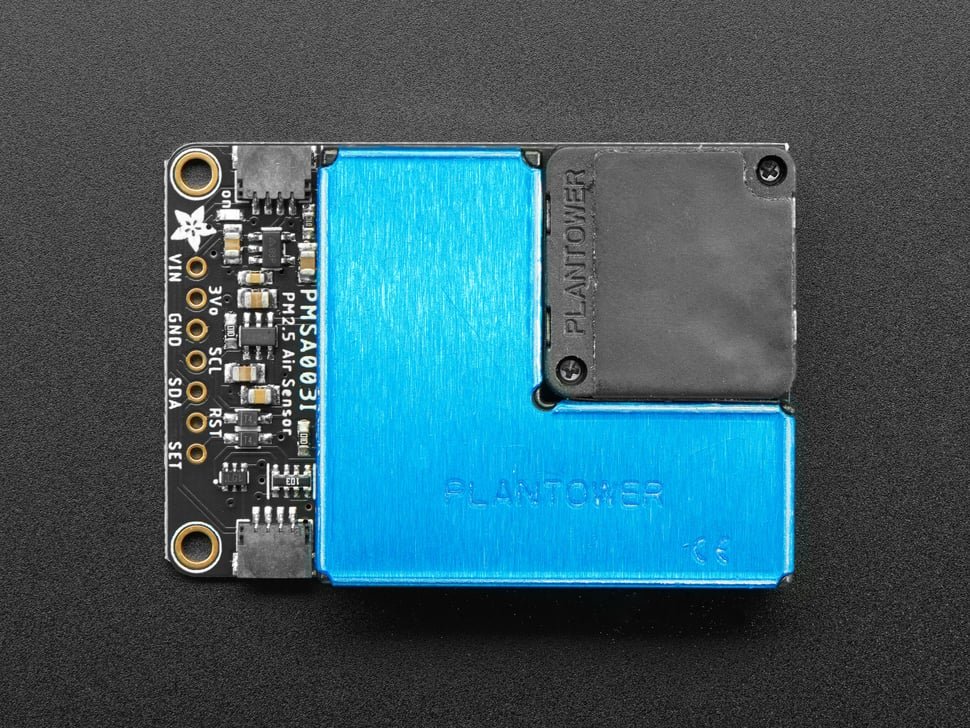
PMSA003I: Air Quality Sensor
The PMSA0031, our PM sensor, measures PM1.0, PM2.5 and PM10.0 concentration in standard and environmental units over an I2C protocol, providing the PM2.5 and PM10.0 values needed to calculate the Air Quality Index (AQI). Again, it is compatible with our 3.3V output from the Feather M0.
-
![]()
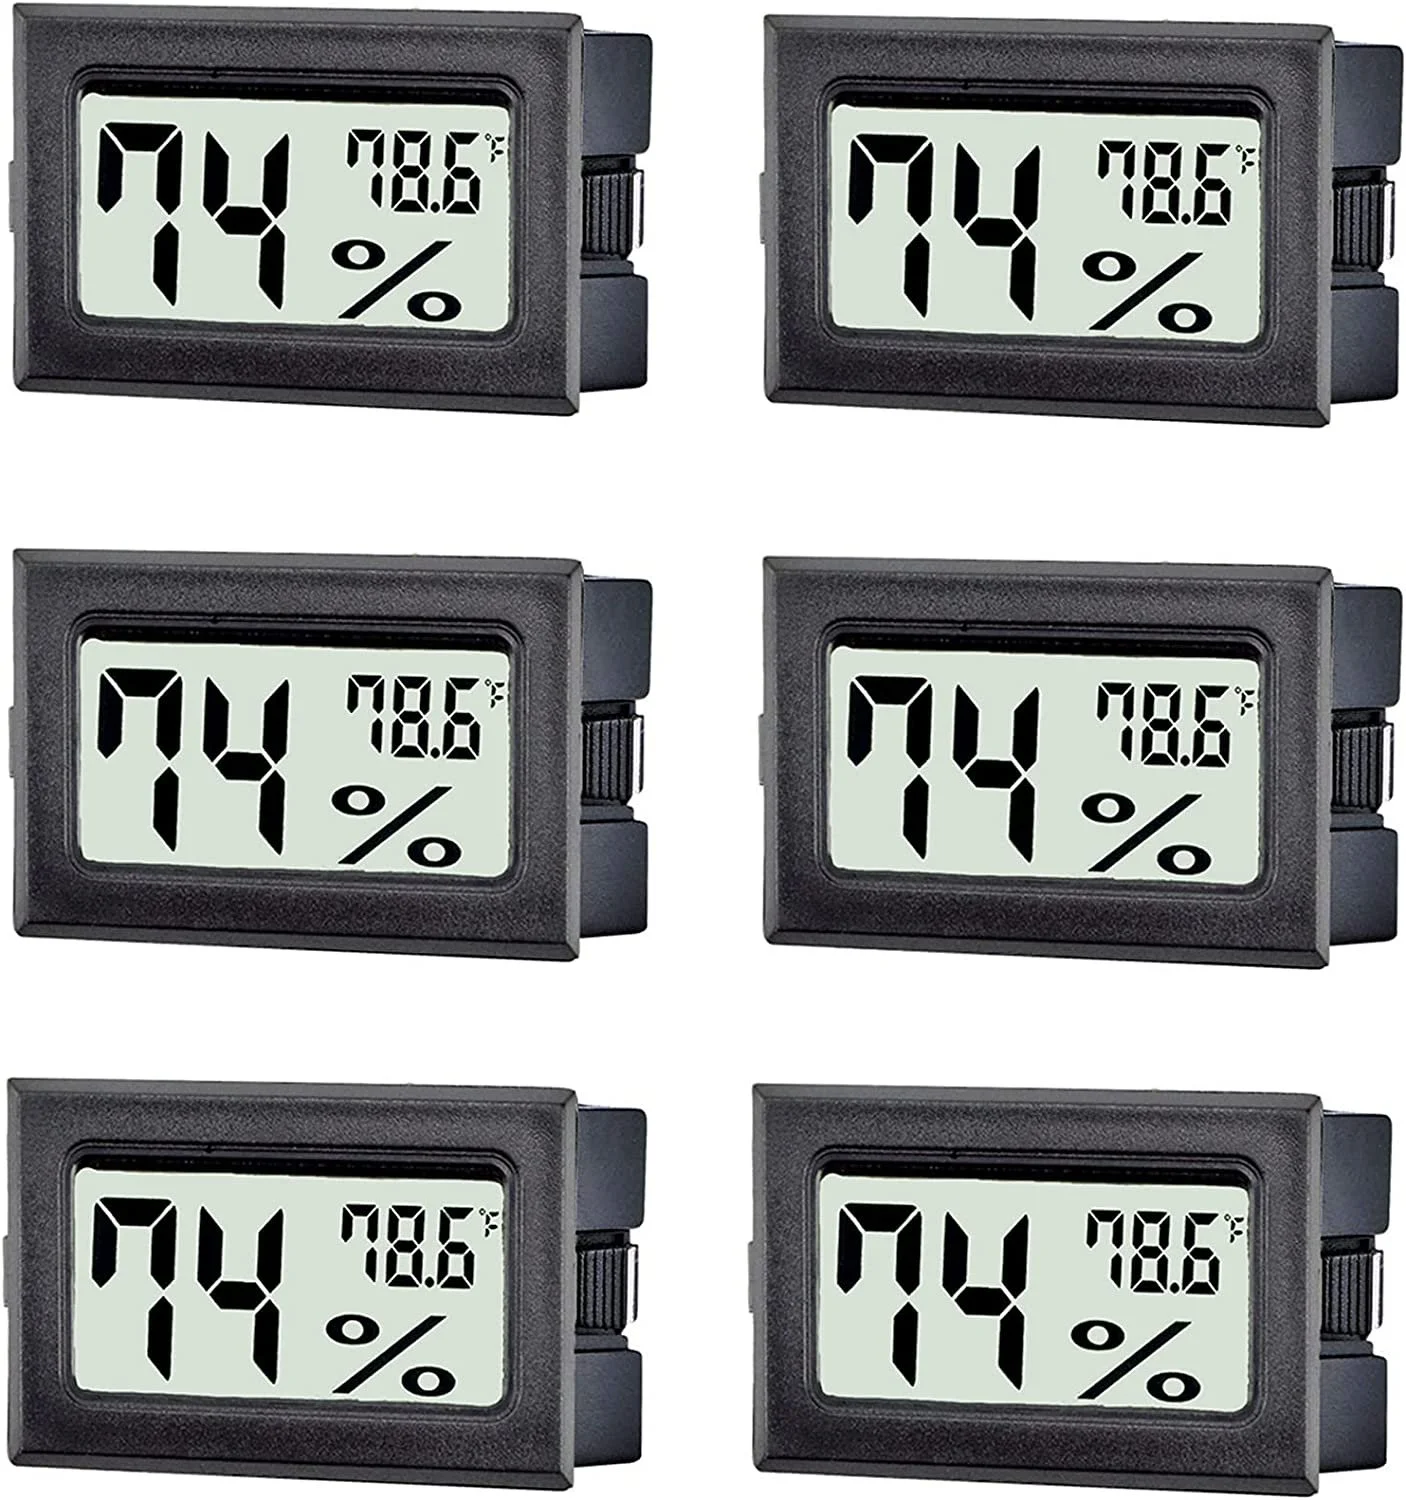
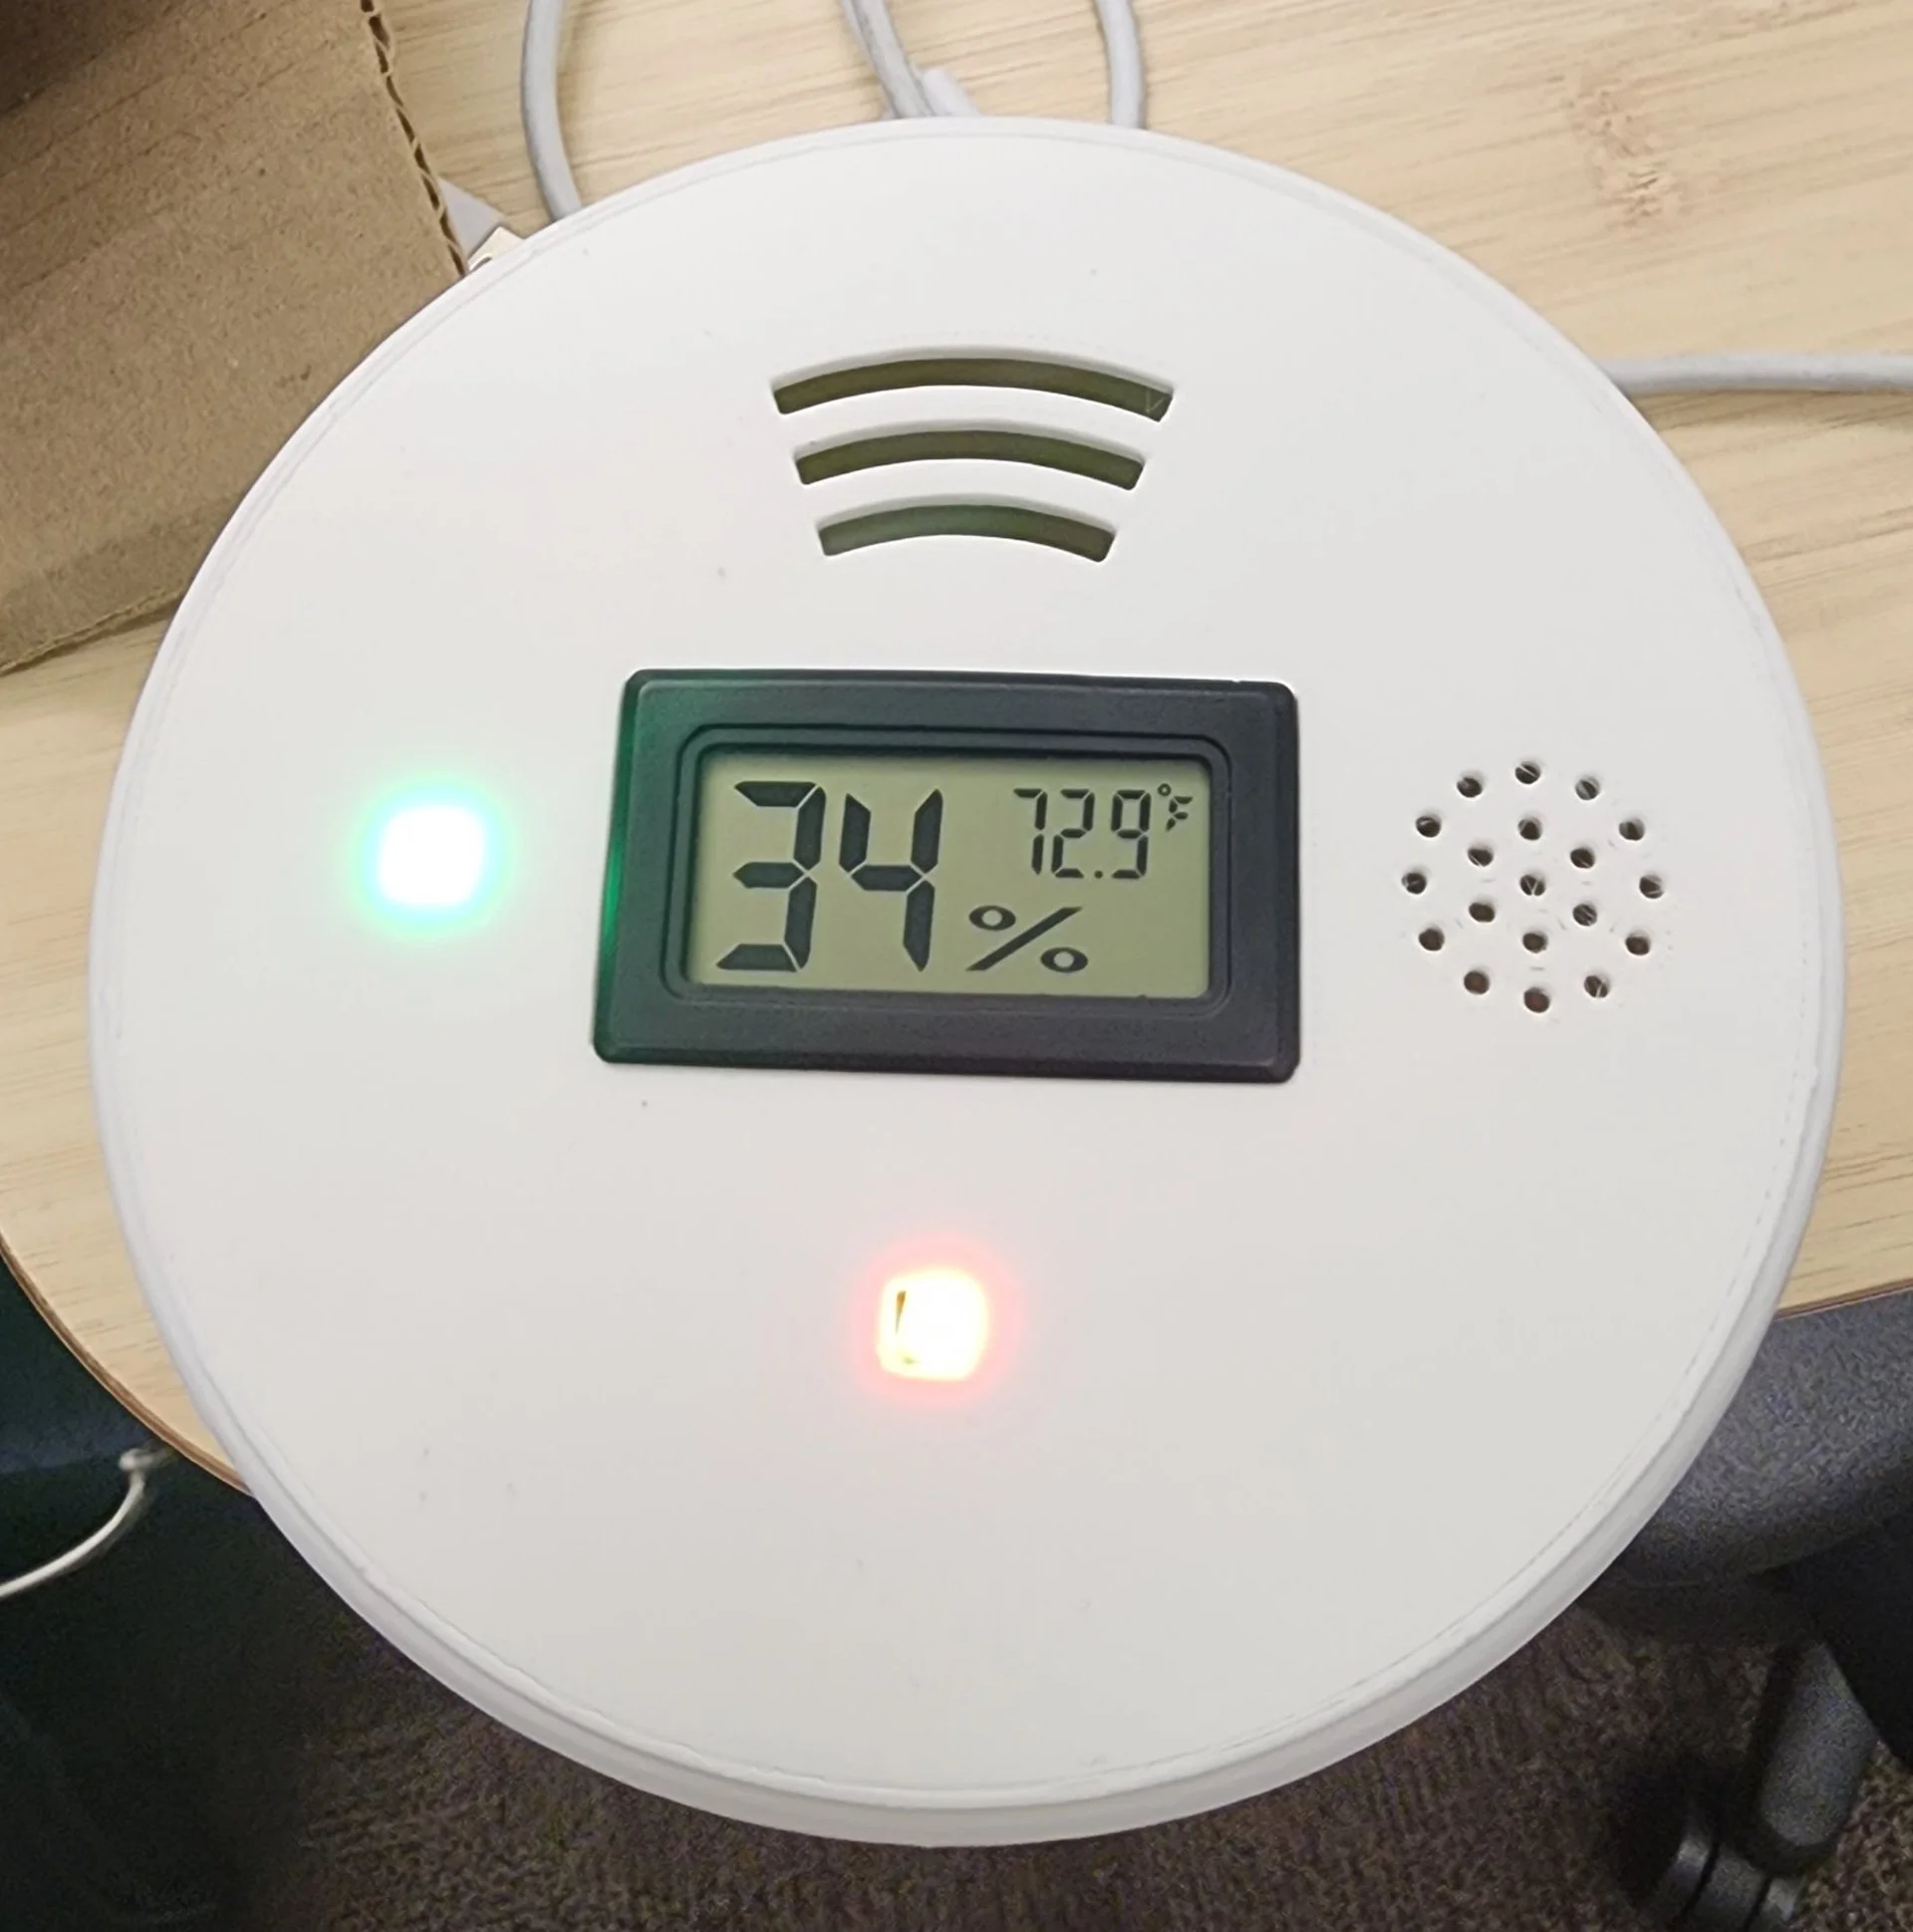
Temperature and Humidity Screen
Because we wanted the user to be able to check on the current temperature and humidity within their home, we also needed some form of visual interface. Ideally, this would be a screen that directly displayed the temperature, humidity, and AQI values our sensors were reading out, but purchasing a programmable screen would be expensive and labor-intensive. For a first proof-of-concept prototype, this level of detail was unnecessary. Instead, we purchased a cheap temperature/humidity sensor with an LCD screen from Amazon. Although this may not be as accurate as the BME680, it provides users with a general idea of their current conditions – the alerting and safe/unsafe calculations will still be done utilizing data from the BME680.
-
![]()
NeoPixel Mini Button: Visual Interface
We also purchased several LED NeoPixel Buttons - individual addressable LEDs. Although these are supposed to be driven with 5V, 3.3V is adequate. These LEDs will change color in accordance with the safety level of current conditions: green = safe, yellow = caution, red = danger. One LED will be used for the temperature/humidity status; the other will be used for AQI status, forming a basic user interface.
-
![]()
Piezo Buzzer: Audio Interface
We wanted multiple methods of alerting individuals to increase accessibility. The elderly population that we are targeting may be visually or hearing impaired, so the redundancy of multiple alerting methods is absolutely necessary. Therefore, we also purchased a piezo buzzer that would emit a loud noise when dangerous levels were reached. This noise is emitted when current is run through the device. Because the Feather M0 Basic Proto comes with some proto board space, we were able to solder this buzzer directly to the microcontroller, allowing for a smaller footprint overall.

Electronic System
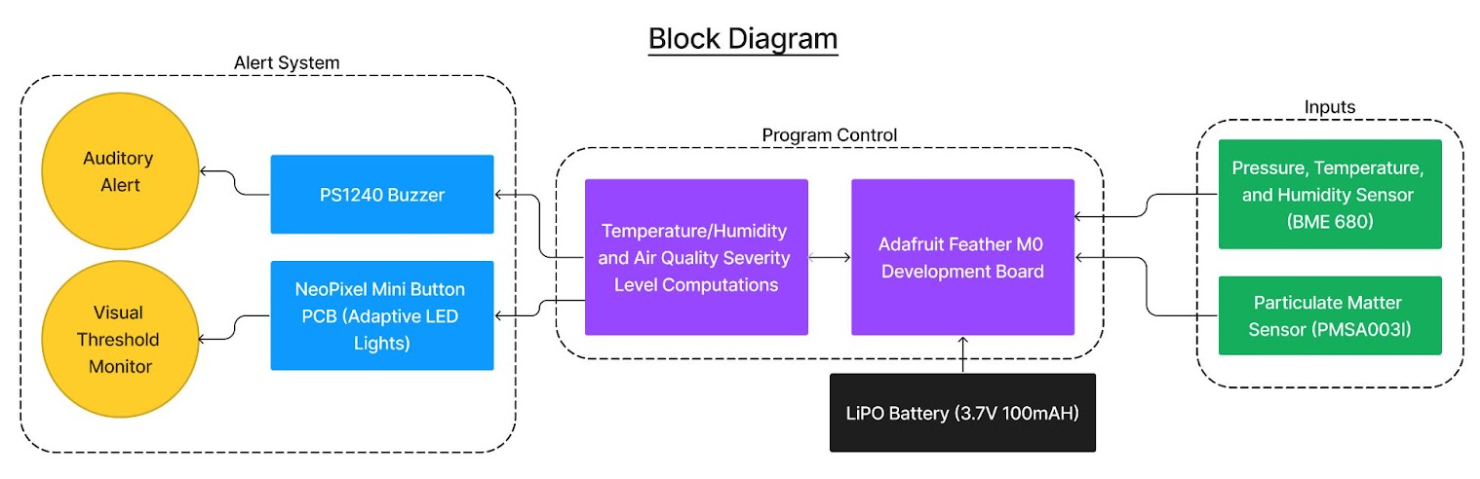
The above image outlines how the system operates at a very conceptual level. Based on the input from the two sensors, the microcontroller performs a series of calculations to determine if the current conditions are unsafe. Based on those results, the microcontroller adjusts the visual and audio interfaces as necessary.
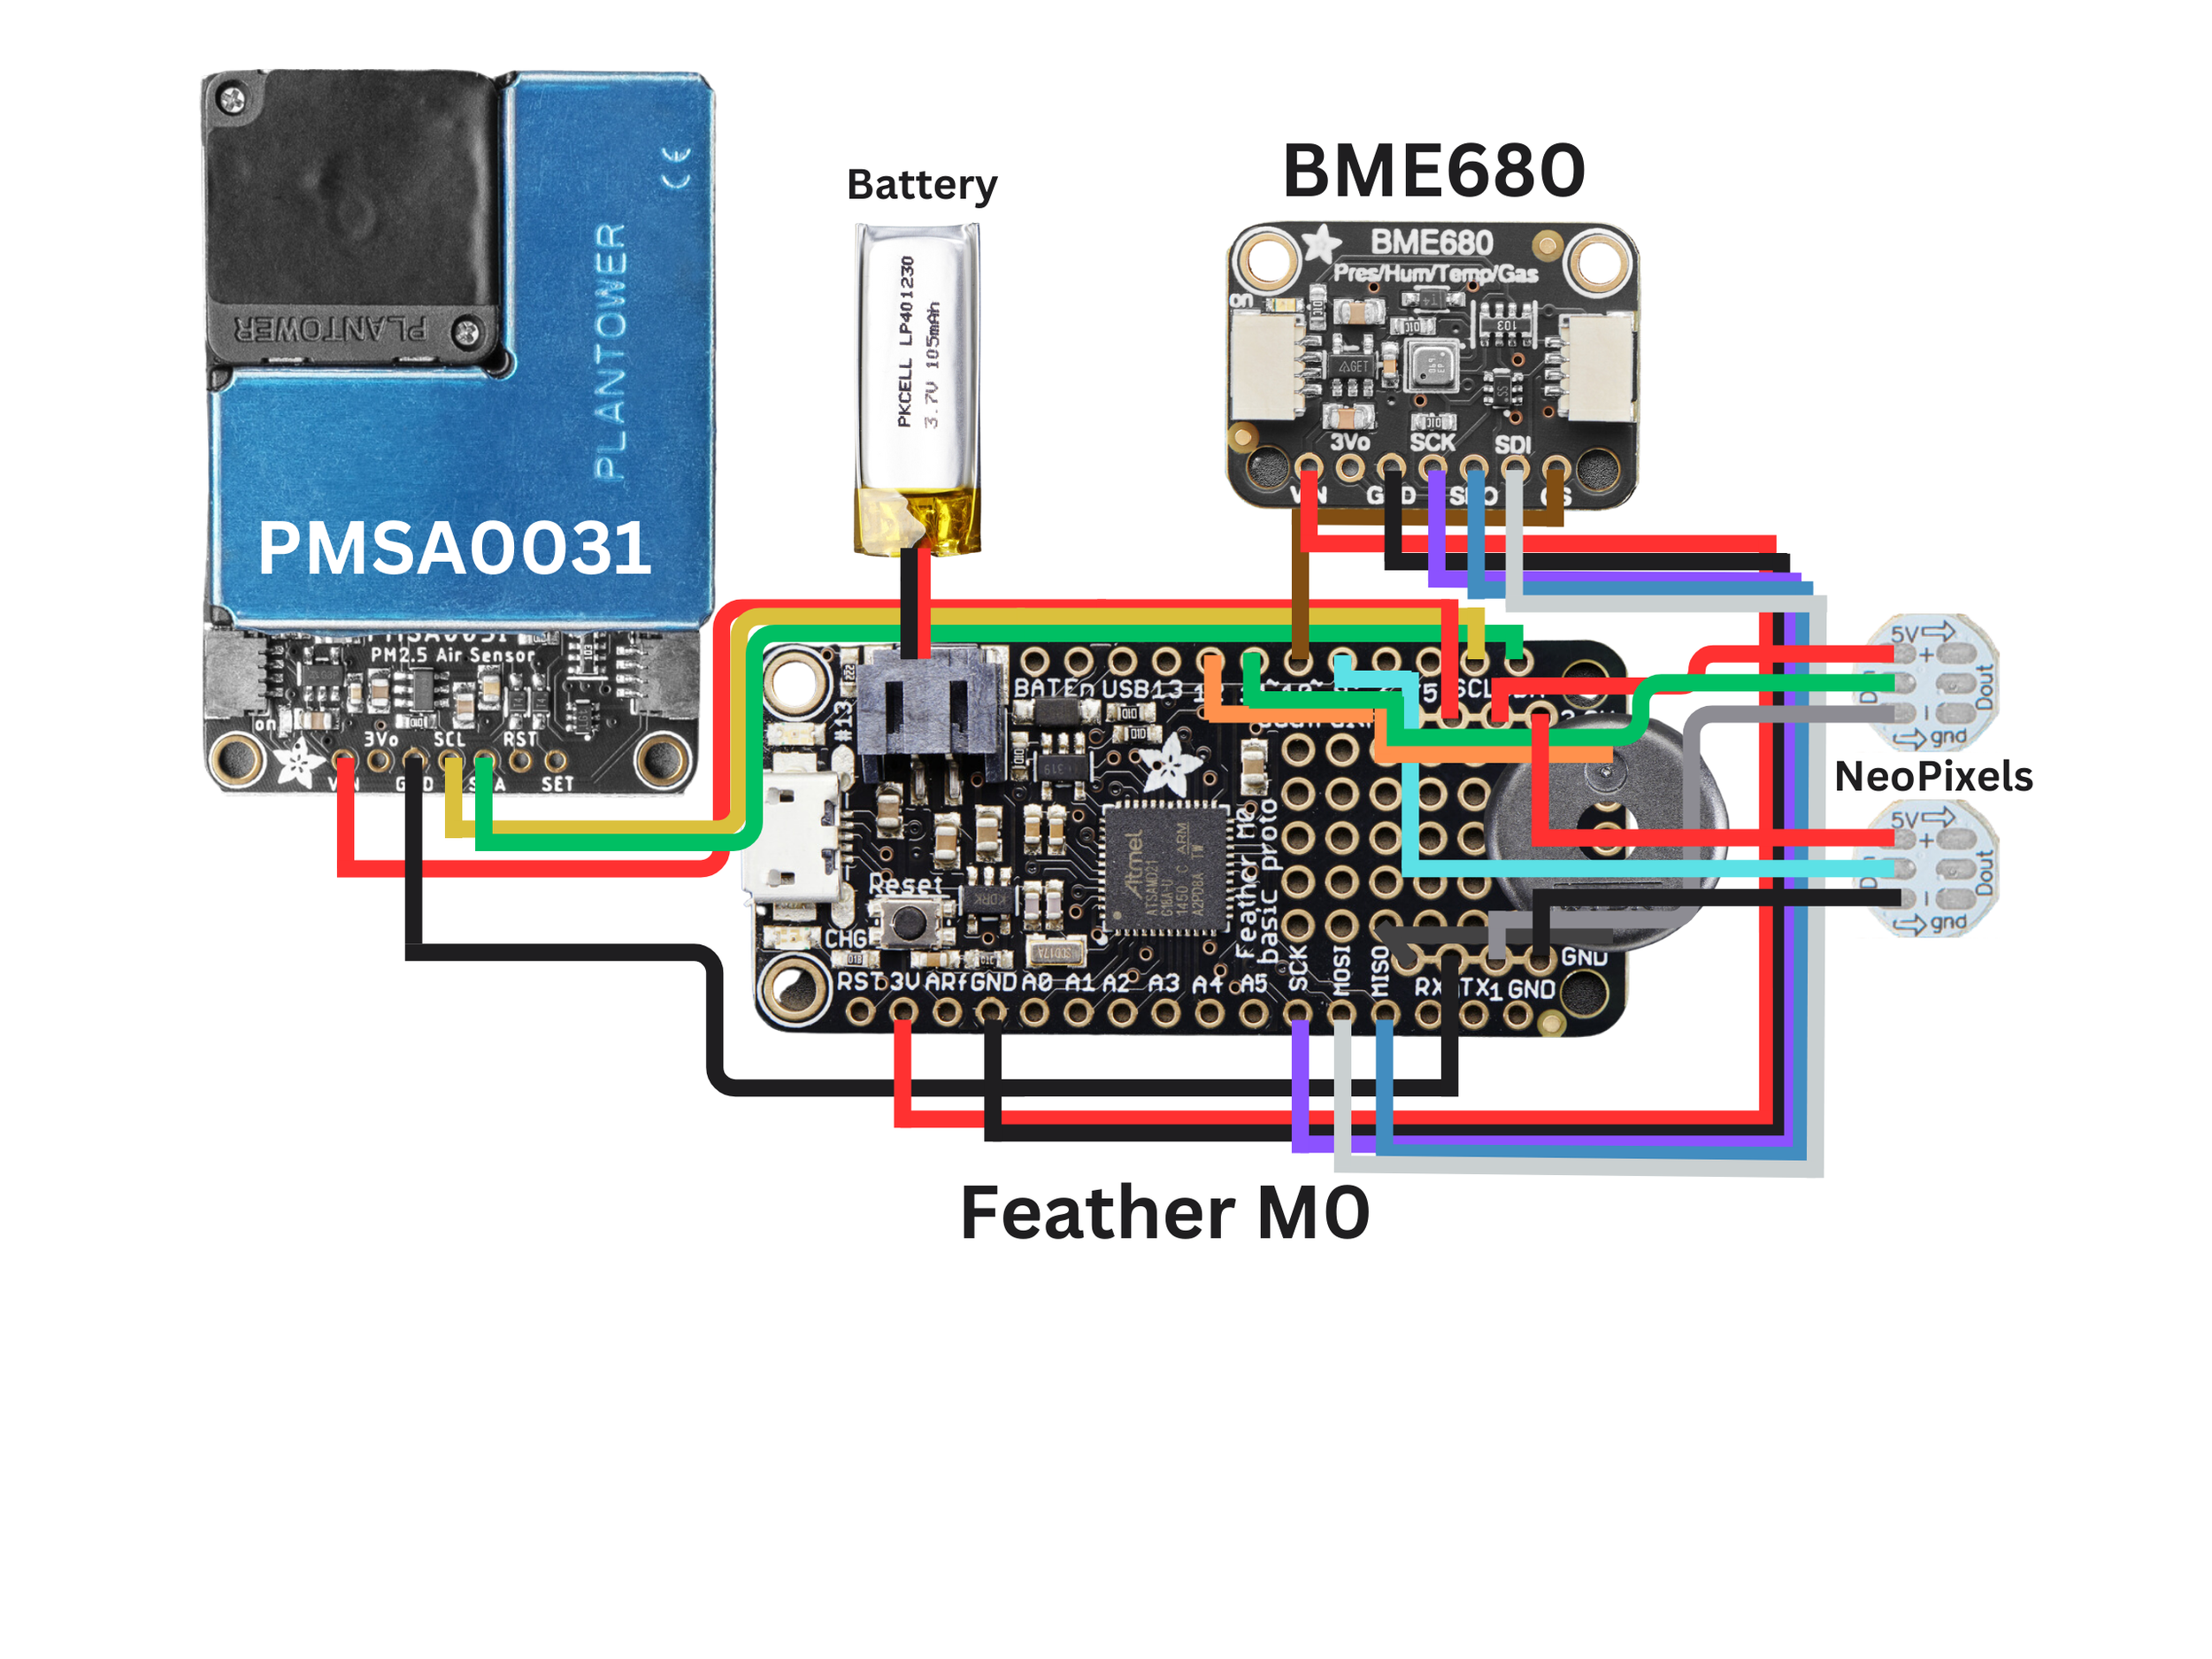
This diagram shows how parts are wired together to achieve the previously shown process flow.
Design Requirements
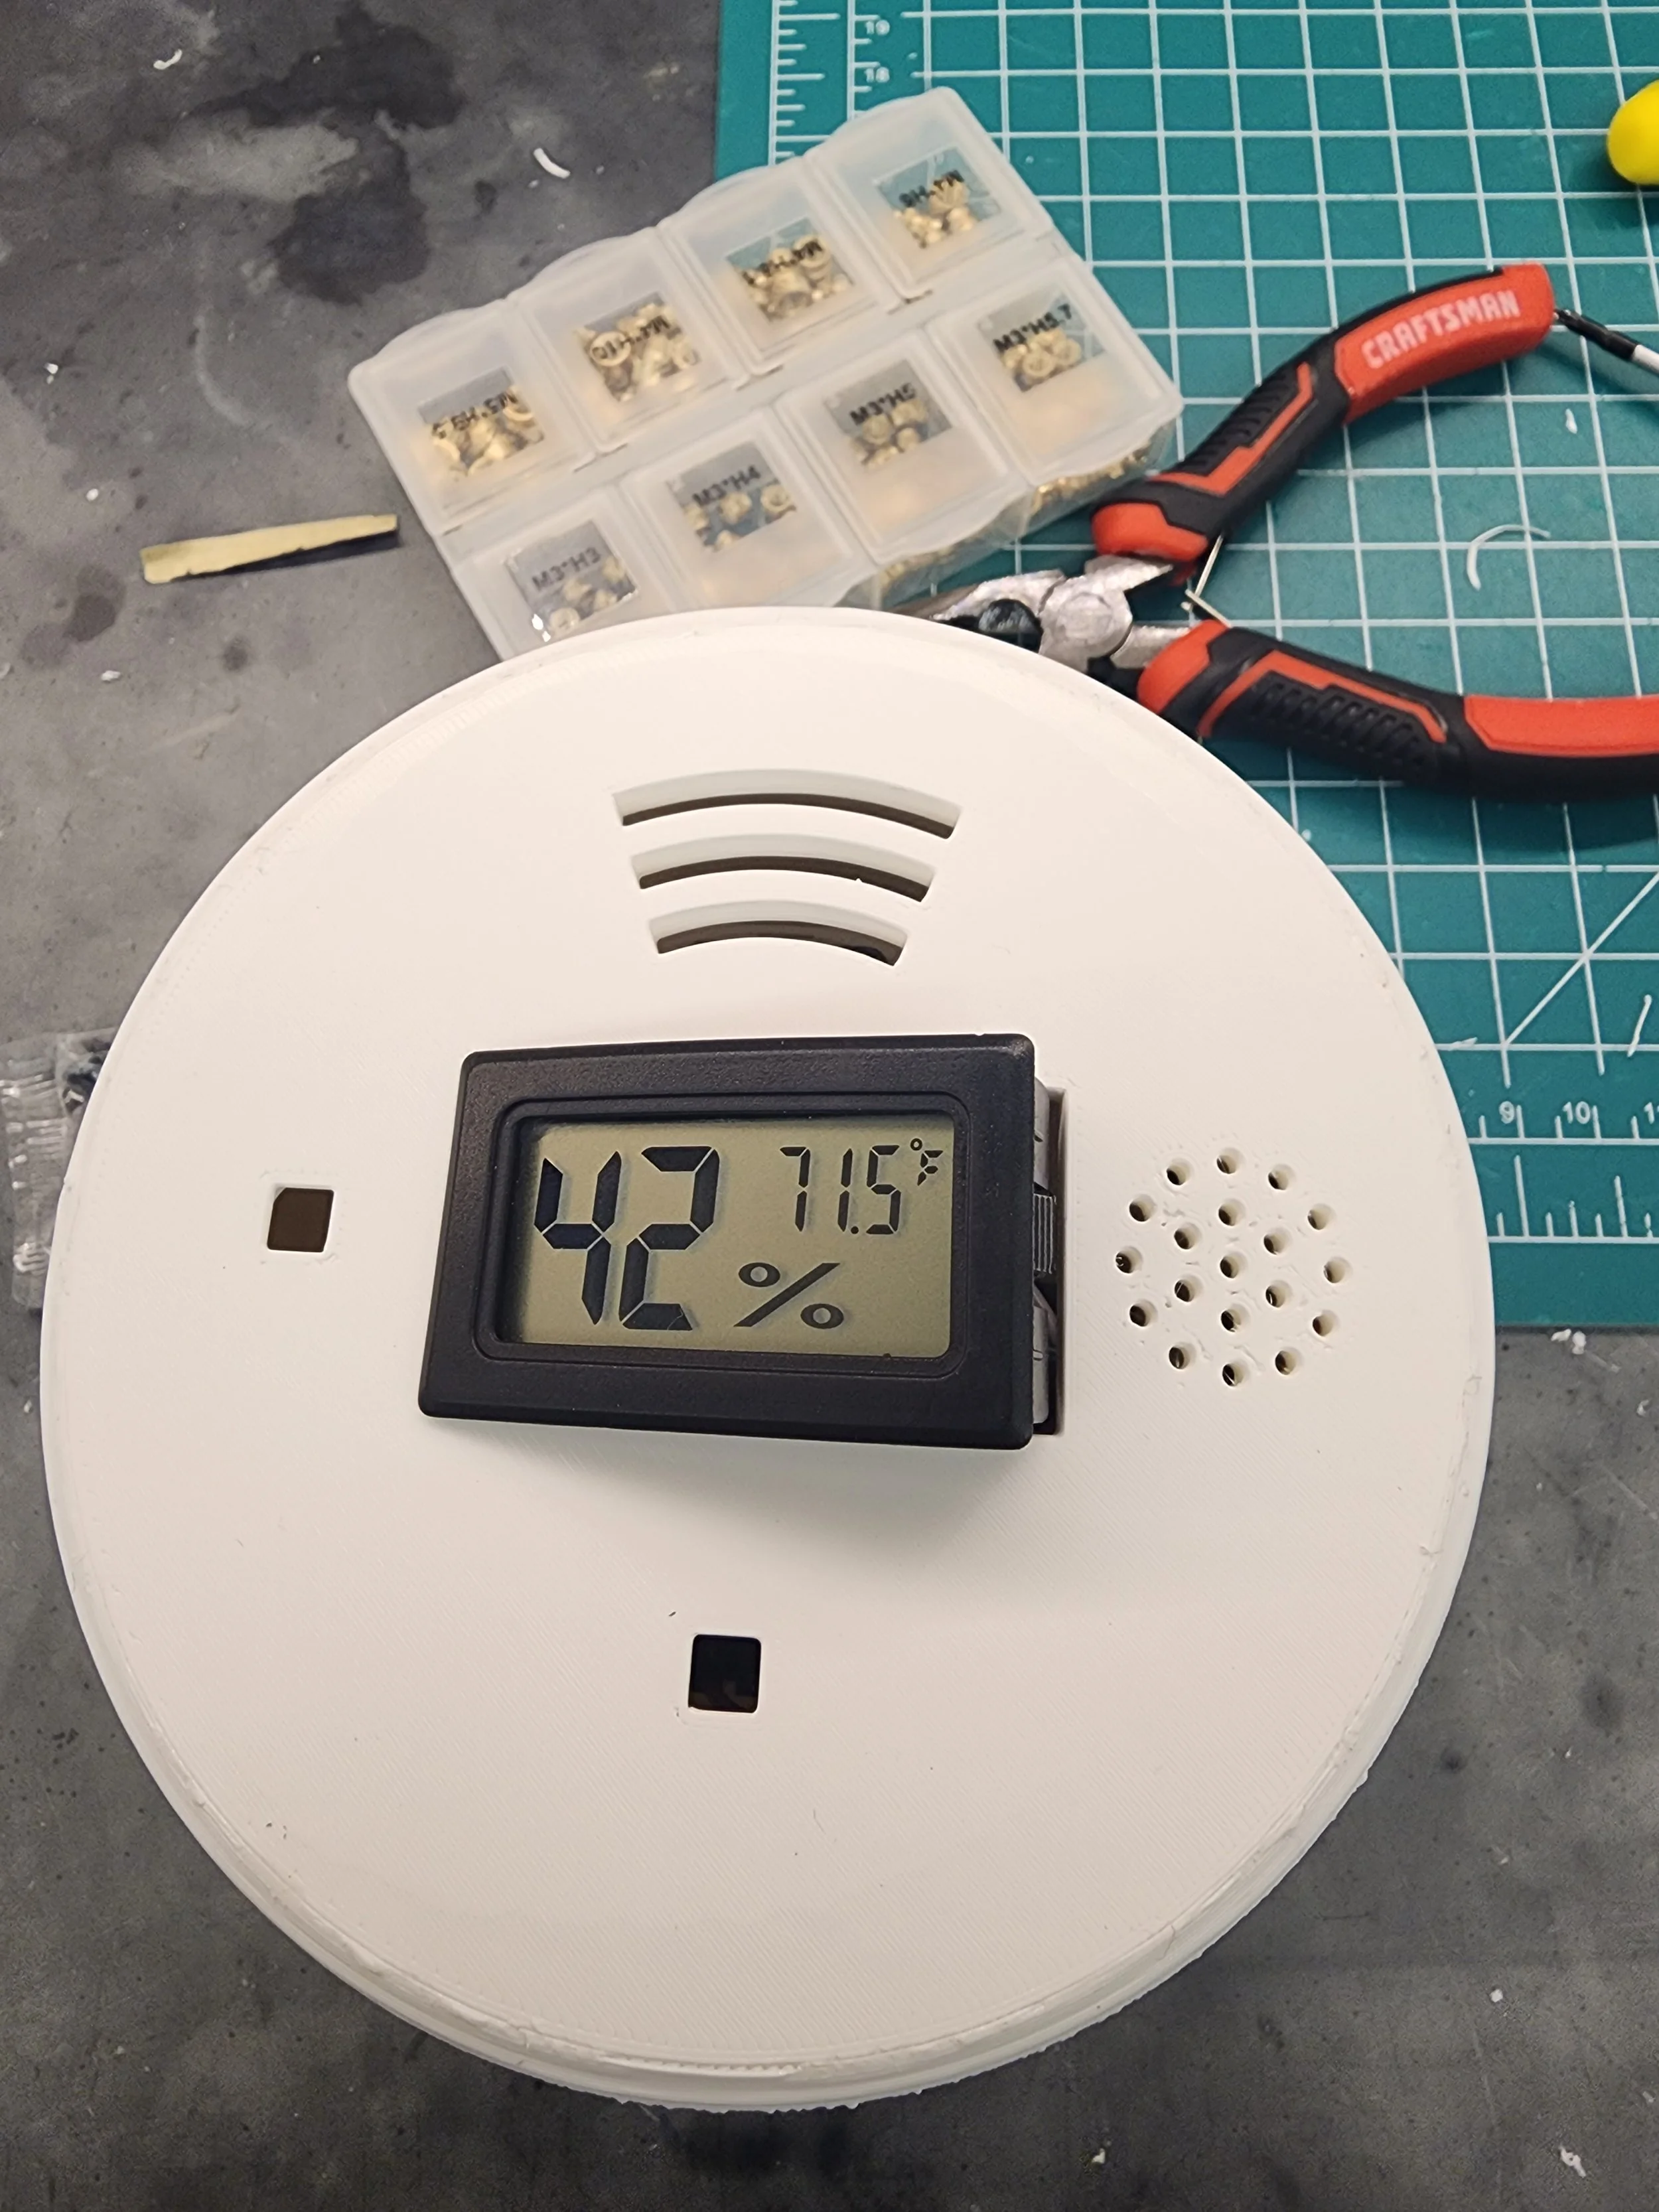
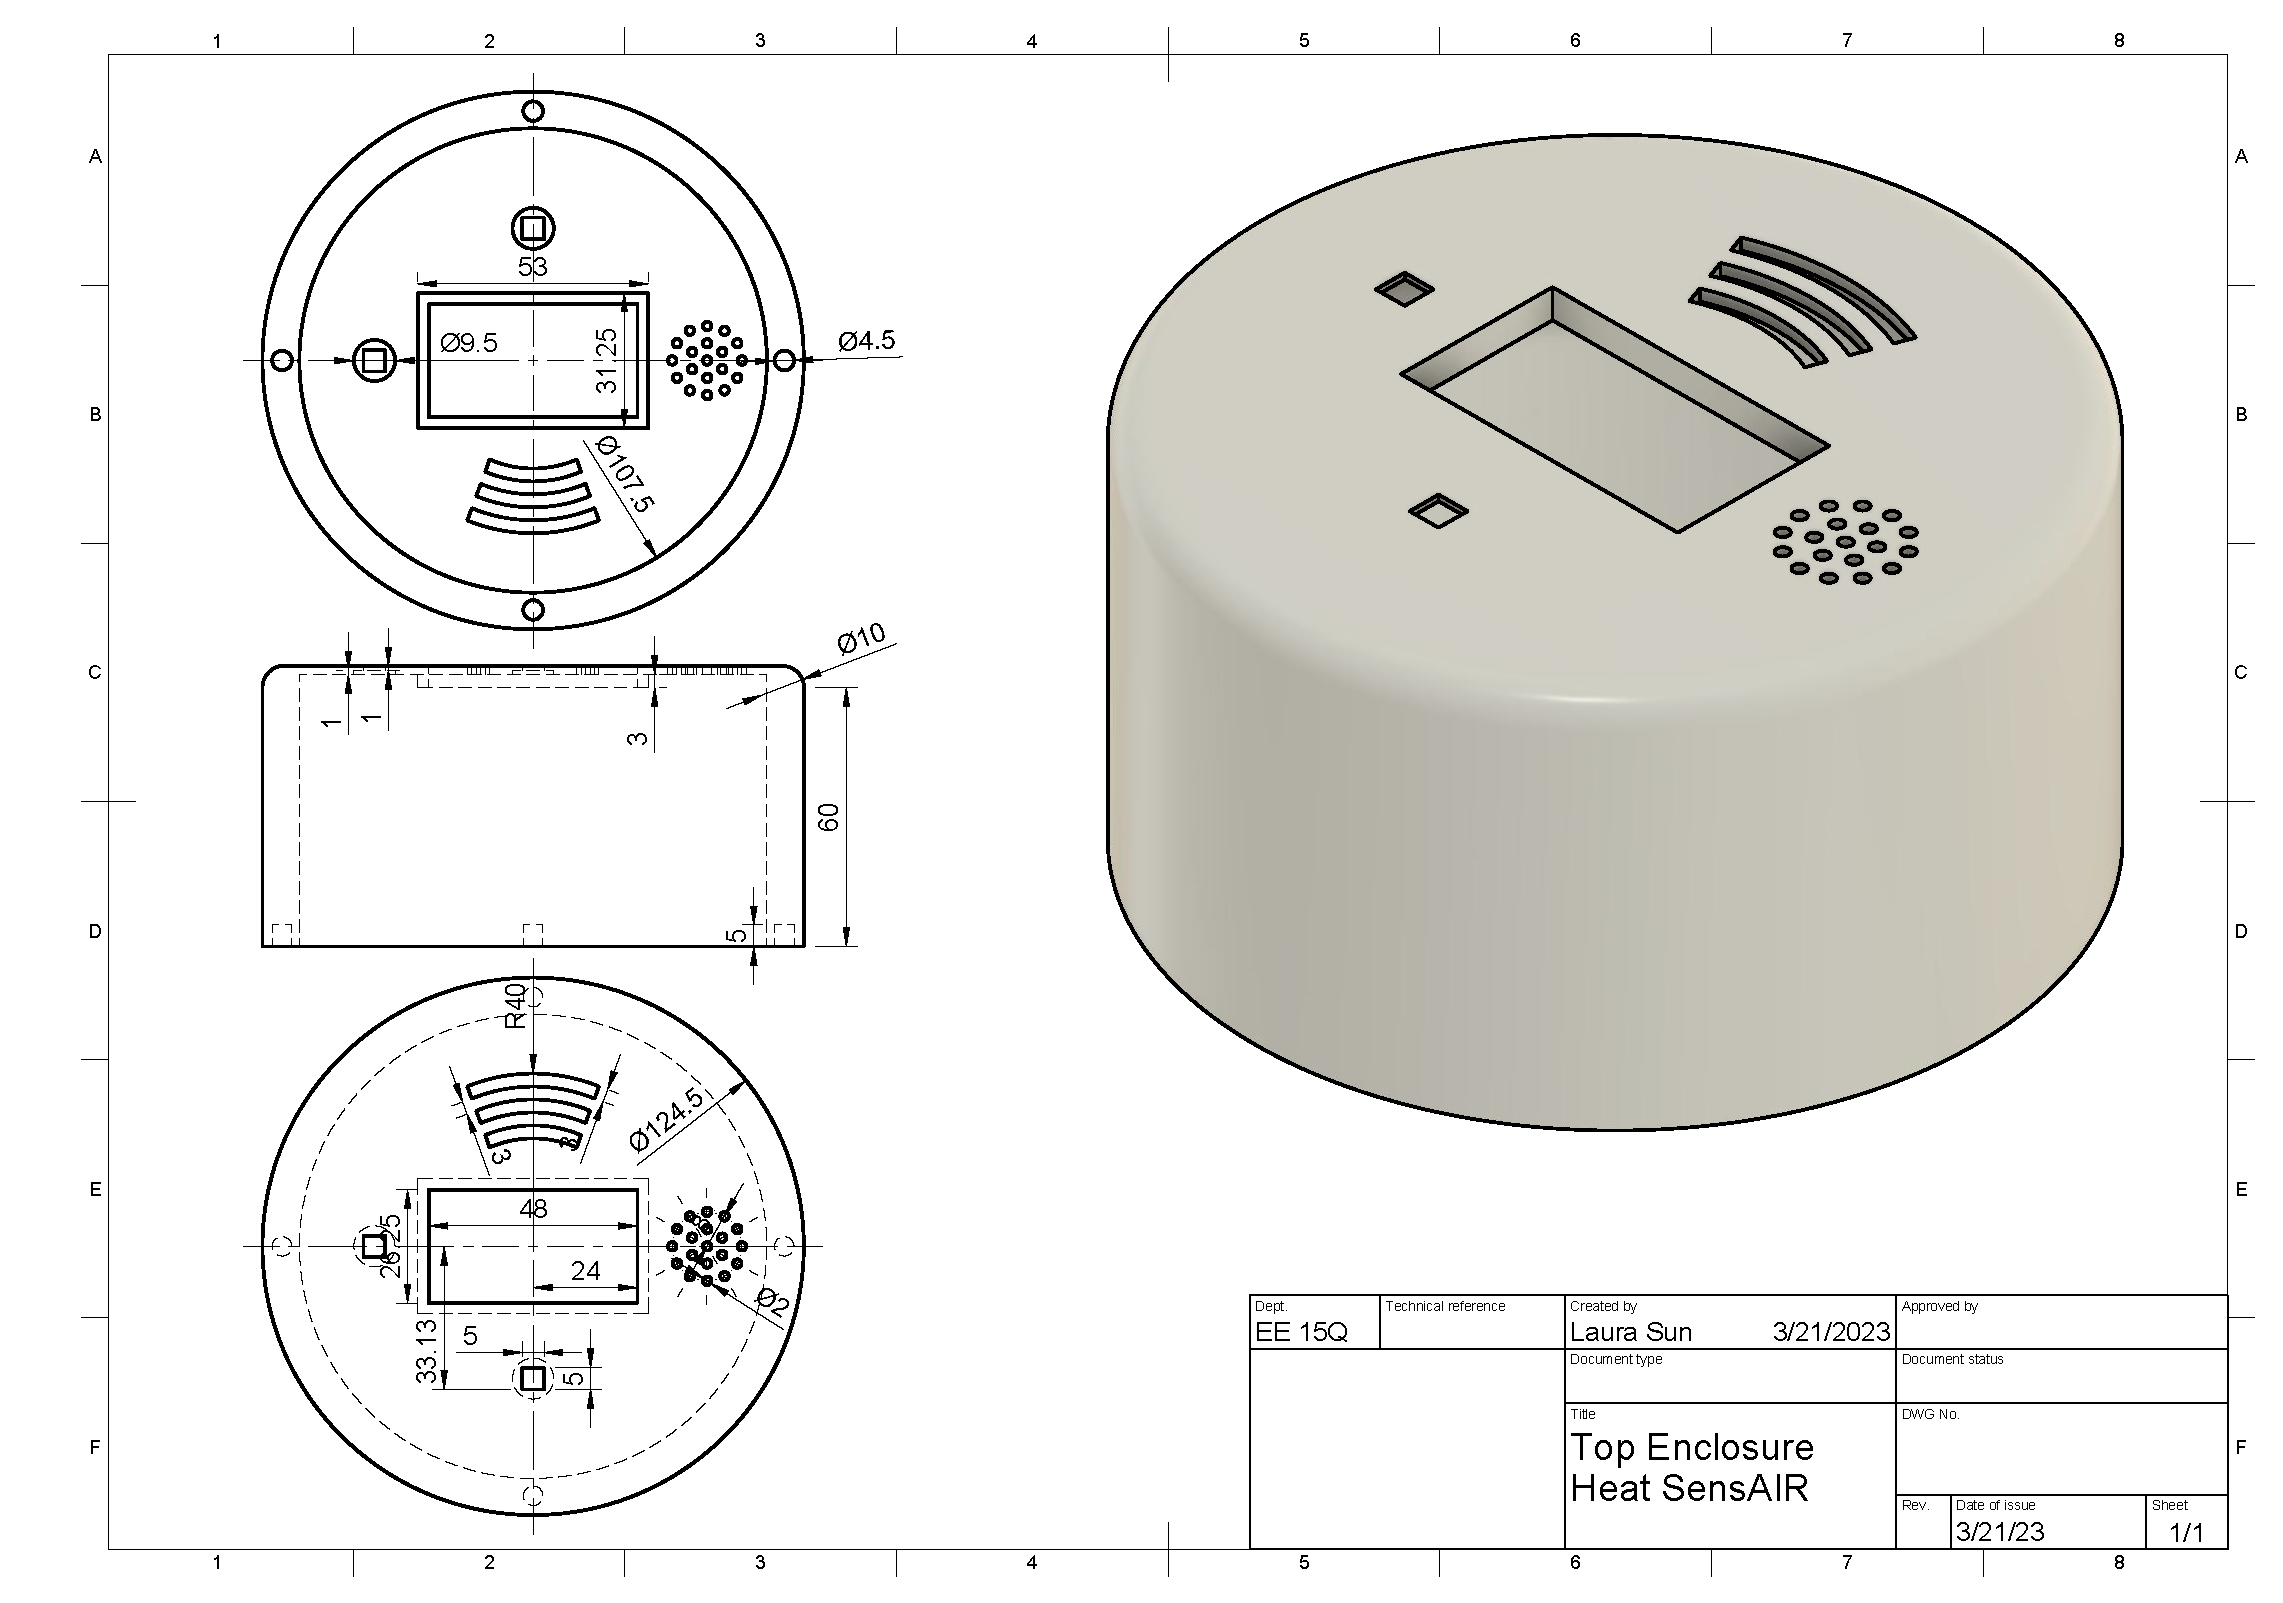
Enclosure Design
Must mount an LCD screen, LED lights based on danger level, and buzzer
Design should have cylindrical shape so that it can be easily picked up and placed on table
Must have slits for adequate air ventilation so that sensors can get an accurate reading
Must have holes to allow sound from buzzer to escape
Initial Prototype
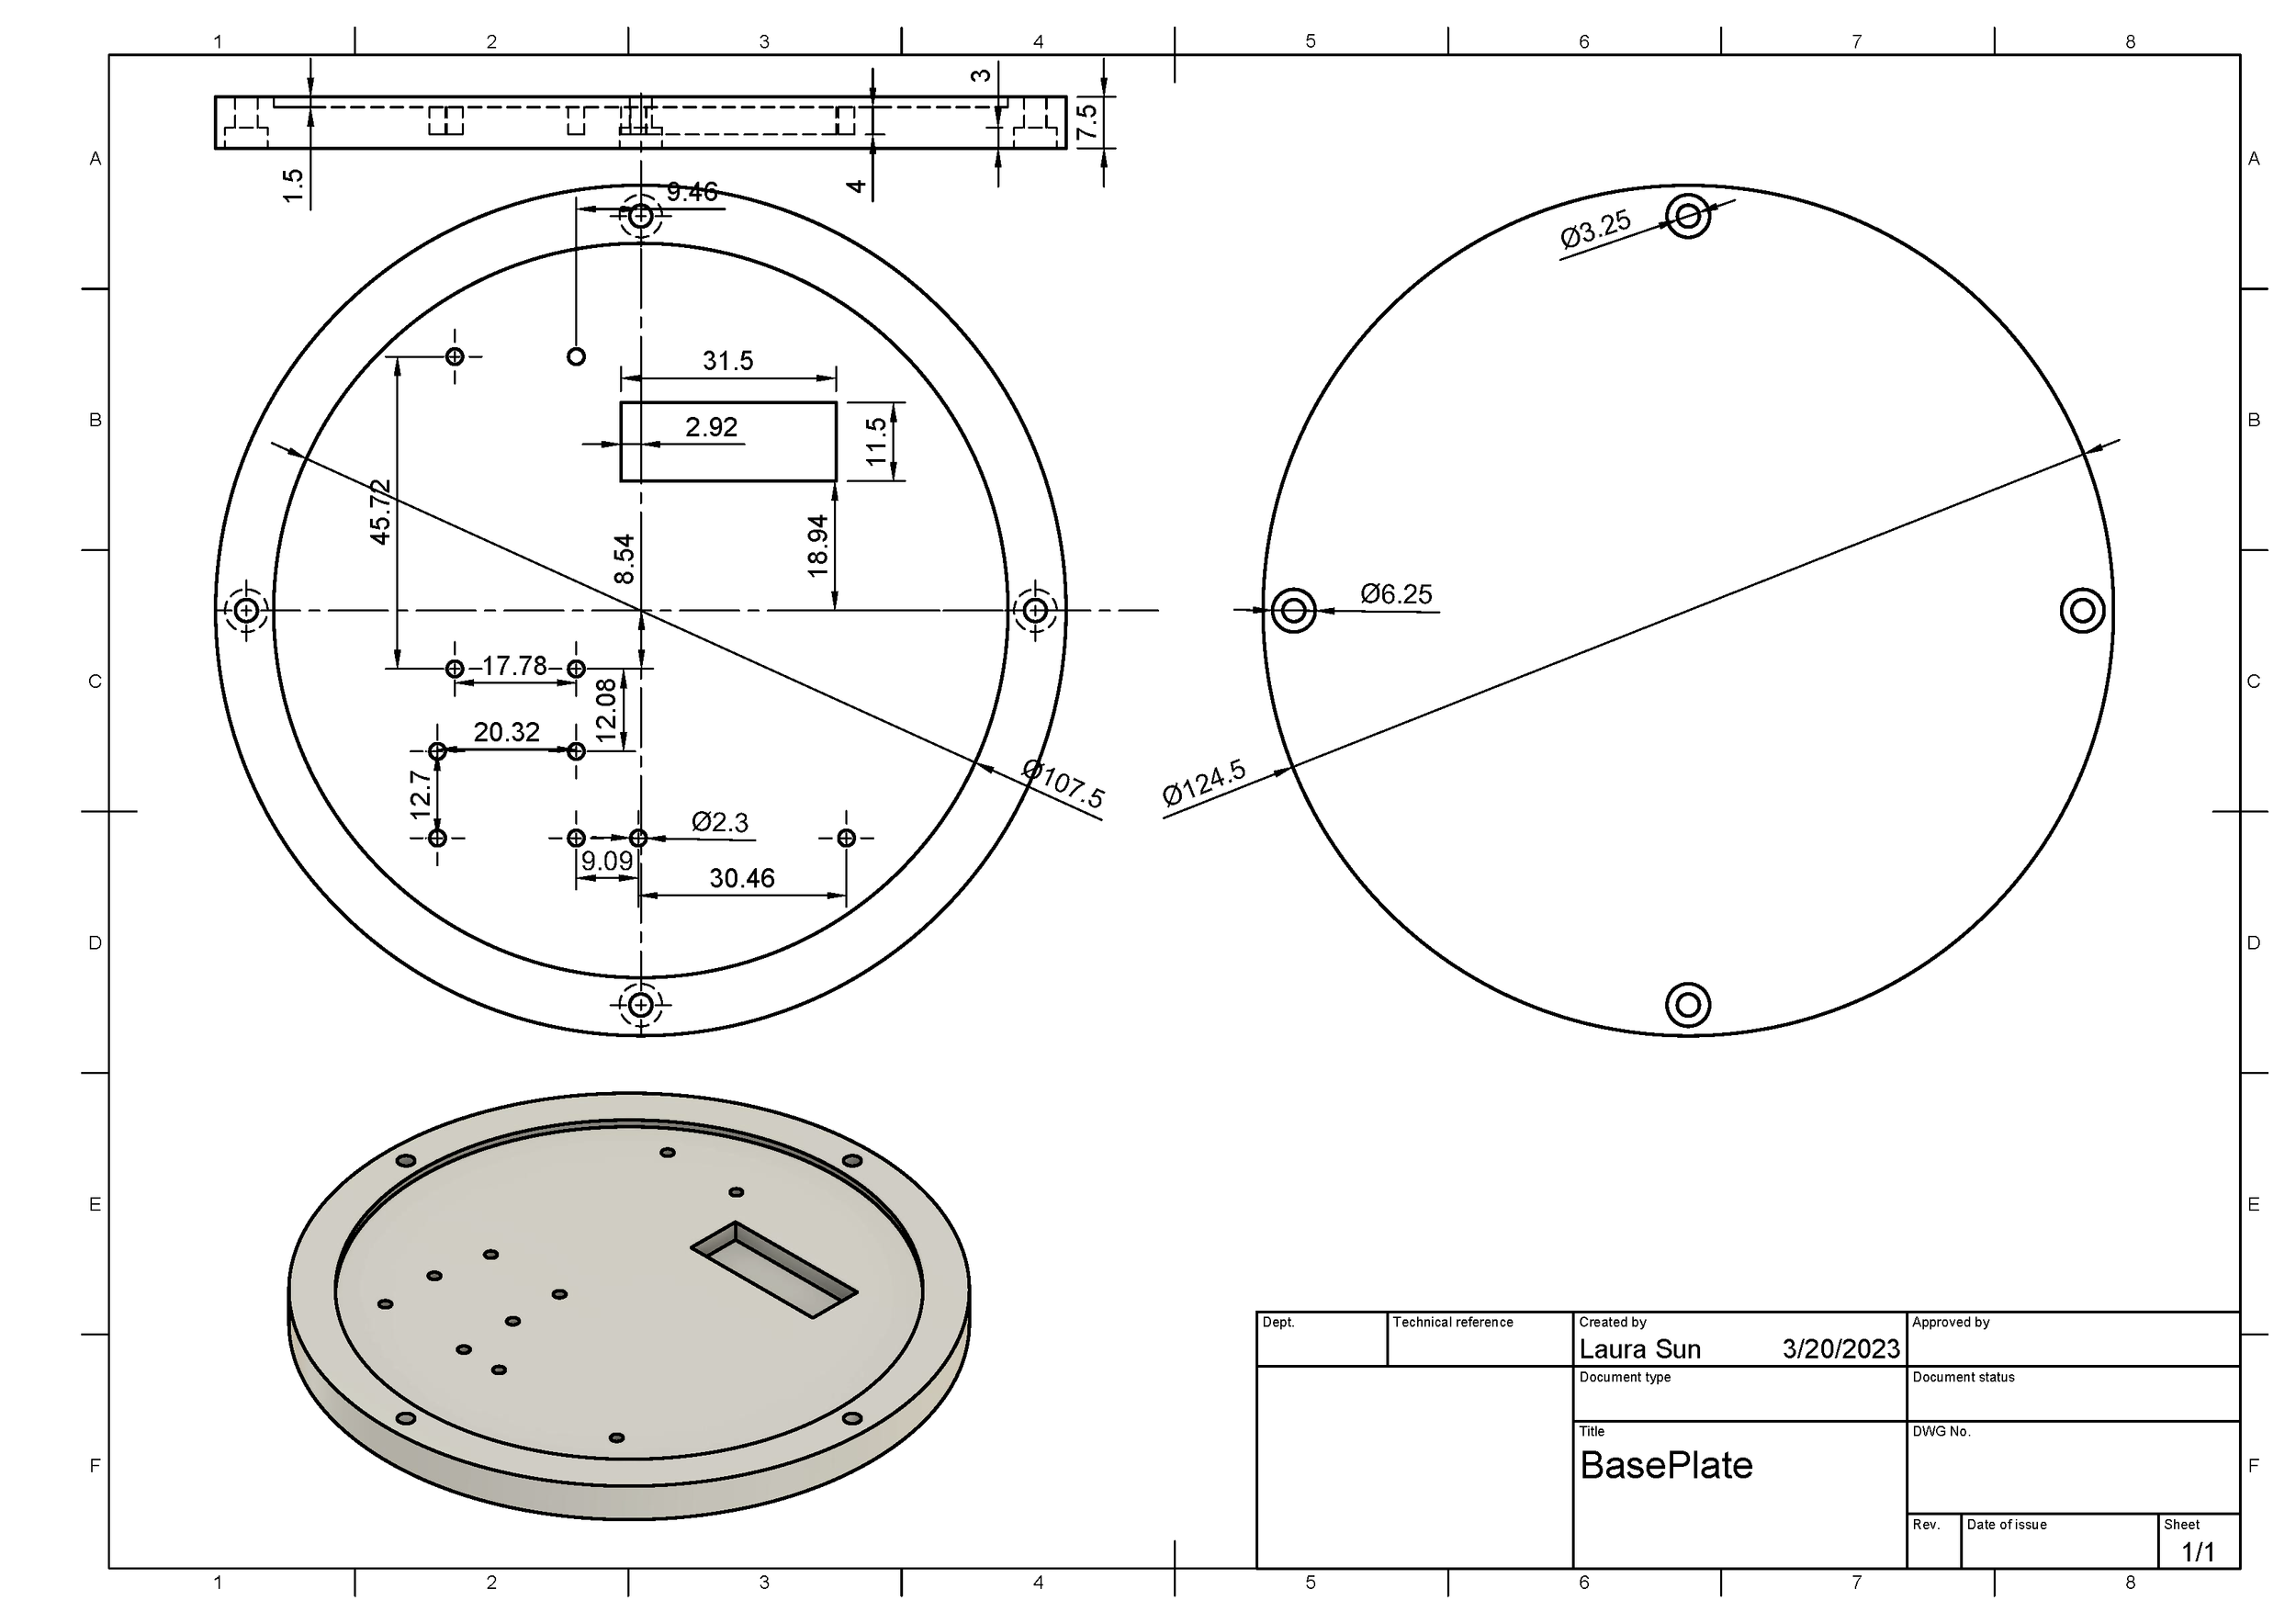
Due to the complex geometry required, we decided to 3D print the enclosure using PLA. It would incorporate stock hardware components such as screws and inserts. The device consists of two pieces:
A base plate, on which electronics are mounted
A top enclosure, on which the LCD screen & LEDs are mounted
The two pieces would be secured together via M3 screws and heat-set inserts. An initial rendering of the design was produced. Additional holes were later added on the top face of the enclosure to allow sound to escape. Initially, we developed a “shelf” design for the base plate. The PM sensor and battery would sit on the bottom, and the Feather and the BME680 would sit on an overhung shelf. This was intended to save space and allow for a smaller device overall. However, once the prototype was printed and assembled, we discovered a few issues.
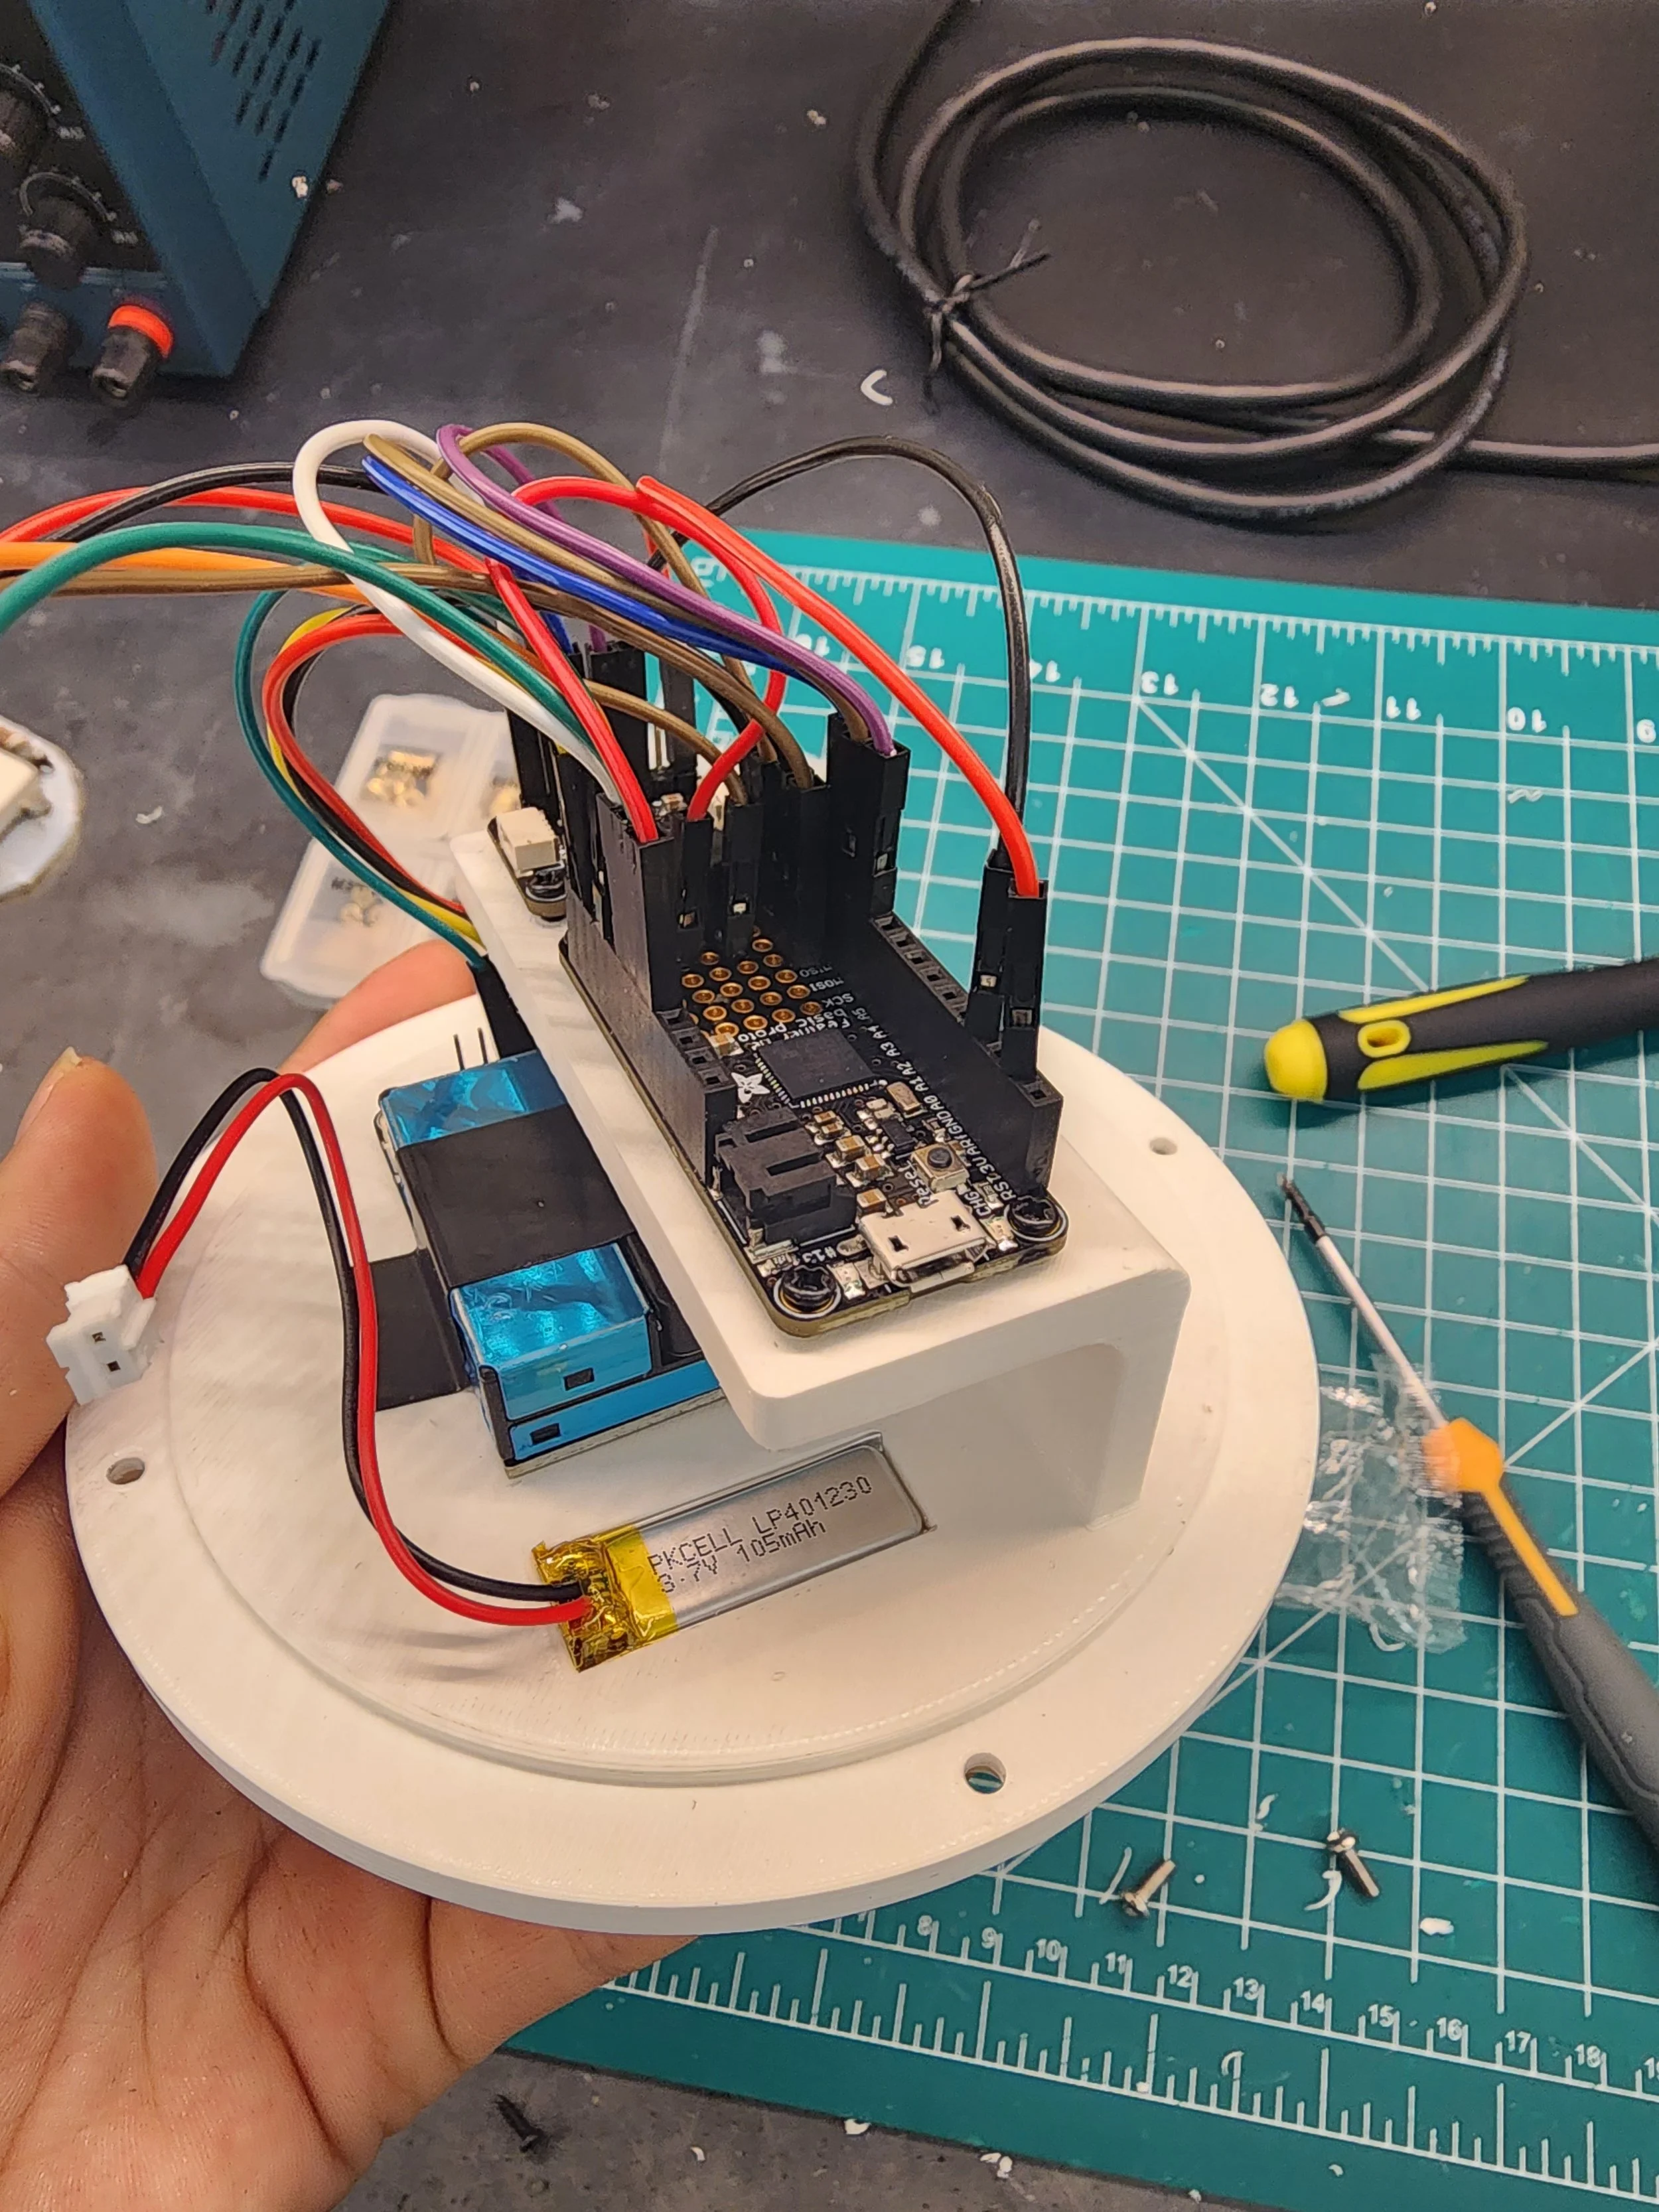
While the shelf design was space-saving in theory, in practice, it complicated the design. Mounting holes on the PM sensor were impossible to reach with a screwdriver, so we had to drill holes to screw in the sensor. In addition, because of the added height of the shelf, the device ended up being extremely tall. The jumper cables were not as flexible as we expected. Therefore, we did not account for enough vertical height, causing the LCD screen to be pushed out of the top of the device.
Final Design
For the final prototype, we would move to a simpler design where all electronics were mounted at the same level on the base plate. Although this forced the device to have a larger diameter, this design enabled a significant decrease in height and support material, allowing for a 2 hour decrease in print time.


Above: CAD assembly for finished design. Below: Engineering drawings for each part.
Final Product
Air Quality Testing

Temperature and Humidity Testing